Boot Care
- Posted on
- By C. Doyle & G.McKendrick

You can do this - Even if, like me, you're a self confessed lazy bones when it comes to looking after your kit after a long day on the hill.
A friend’s boots were furiously leaking, she may as well not have had soles on them at all. The trusty old boots of another person I know started to fall apart as she walked through Heathrow en route to an expedition – not exactly the best of timing!
What did these two people have in common? They weren’t buying cheap boots. They both thought they were looking after them reasonably well. So what was going wrong?
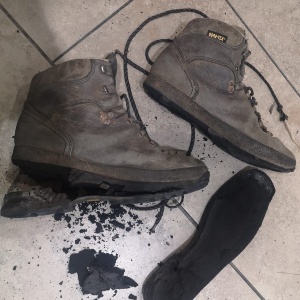
They were drying out their wet boots incorrectly.
Drying your boots too close to the stove or fireplace, in your hot-press/airing cupboard will damage your boots over time. The material will crack and the adhesive will erode. The same can be said about the seam seals of most outdoor kit (tents, jackets etc.) You’ll get away with the odd drying room usage, but you won’t get away with longer term drying them after every walk on the radiator or in front of the fire. Plus the soil, particularly in the boggy hills of Wicklow (or any boggy area) is quite acidic – so the combination doesn’t do your boots any favours.
So, how should you look after your boots to get the longest possible life out of them? It actually doesn’t take much. Myself and Gus McKendrick (Salewa) put our heads together to bring you some practical, easy to follow tips!
After Every Use/Weekend of Hiking:
- Leave your boots in a cool, dry place to dry naturally.
- Drying the inside: If they are wet internally, remove the insole and leave it propped up in the boot so it doesn’t get mislaid. Try not to use newspaper stuffed into the boots to assist the drying process. Ink from newspaper can clog up the waterproof membrane. Doing it in a pinch is fine, but long term isn’t a great idea. Instead cut an old microfibre sports towel or facecloth into strips and stuff these inside. These are better for your boots and can be re-used time and again. Alternatively grab yourself some boot bananas!
- Once dry, go outside and bang the soles together to remove dried soil from between the lugs.
- Using a gentle boot brush or a damp cloth, brush off any remaining soil from the uppers, taking care around the rand.
Periodically they’ll need a deep clean:
- To maintain waterproofness of your boots, they’ll need a more thorough cleaning and reproofing periodically.
- Remove the laces and insoles.
- Fully open the boot tongue and submerge the boot in luke-warm water. Using a NIKWAX footwear cleaning gel, cover both the outside and the inside with the cleaning gel and rub away surface mud or any sweat stains (as best you can) from the inside.
- I know what you’re thinking – you’re thinking – clean the inside?? This gel isn’t cheap, I’m just going to do the outside and it’ll be grand. And for the most part it will be, but once a year, you should also clean the inside as the membrane is best cleaned from the inside out. So if your boots have had a rough winter, they might need this bit of TLC.
- Sluice your boots with fresh water and ensure all the gel and suds are removed from the boot.
- Clean the insoles and laces in the same way. If the insoles smell particularly nasty, you can use the sandal wash product from NIKWAX, which has a deeper odour removal chemical to aid with built up sweat removal found in sandals and flip flops.
- Leave to air dry naturally at room temperature, and dry the inside as outlined above.
After a deep clean, they’ll need to be re-proofed. If you’re thinking about re-proofing your boots, but haven’t cleaned them properly, you really should take the time to do the job properly. Your boots will thank you for it. There are several products on the market from Gear Aid, Grangers and NIKWAX. Always follow the manufacturer’s guidelines.
Re-proofing Tips:
- Best done damp.
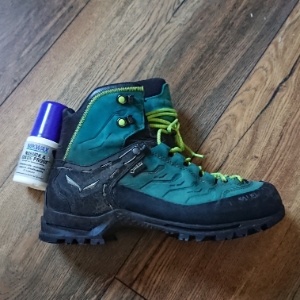
- For our Salewa Mountain Trainer Mid Boots (suede upper) and our Salewa Rapace Boots (nubuck), Salewa recommend using the NIKWAX fabric and leather proofer immediately after the boot has undergone cleaning. The NIKWAX fabric and leather proofer comes with the cleaning sponge applicator which is easy to use. Coat liberally on the outside of the boot (not inside) and work in around the upper and toe rand.
- Remove any excess with a damp cloth
- DO NOT TREAT laces or insoles, the laces can lose their natural friction / grip and make them sloppy, the inner soles become more malleable and can slide around, so you can end up skating around the inside of the boot!
Repair:
- Don’t use super glue use to repair rand splits or holes, you could do more harm than good. For instance, with Salewa boots, the GTX inside is a bootie construction and is not bonded to the inside of the outer most material. If the two layers of material become bound they’ll rub one another and will tear causing the boot to leak.
- New laces, insoles and even outsoles for most Salewa footwear we can source for you.
Salewa Recommend:
- NIKWAX Footwear Cleaning Gel
- NIKWAX Fabric & Leather Proof
- And for those nasty smelling insoles NIKWAX Sandal & Sports Shoe Wash